
Assume breach and minimize the impact with network security groups
In this blog post, I’ll explain how to restrict subnet traffic flow with network security groups and create fine-grained rules with service tags. Why it’s important to isolate workloads and resources inside your network to minimize the damage of a potential breach. As always, I’ll use the SmartMoney application as an example.
Assuming breach is one of the principles of Zero Trust. It basically means that we should assume that an attacker is in the network and minimize the damage of what an attacker can do. Every time you design a network, you should assume that a breach will happen at some point and that you try to minimize the impact of that breach. A best practice is to isolate workloads as much as possible. The Hub Spoke network topology allows us to do that by creating a spoke network for each workload. On top of that, we can segment the network into subnets and use network security groups to control the traffic. In this article, I will explain how network security groups work and how you can use them to follow the Zero Trust principles.
In March 2017, personally identifying data of hundreds of millions of people was stolen from Equifax
Equifax, a credit reporting agencies that assess nearly all American citizens, was hacked due to widely known vulnerability in a web portal. After the hackers where inside the network they were able to move freely through the network because no network segmentation was implemented. The hackers were able to stole millions of personal information on a time span of months. After the data breach, Equifax settled with the Federal Trade Commision for $425 million dollars to compensate the victims.
- 143 million people were affected.
- 76 days the hackers were active in the Equifax network without being discovered.
- $1.4 billion was invested by Equifax to clean up and improve the infrastructure, application and security.
- $425 million is the amount Equifax settled with the Federal Trade Commission to help people who were affected.
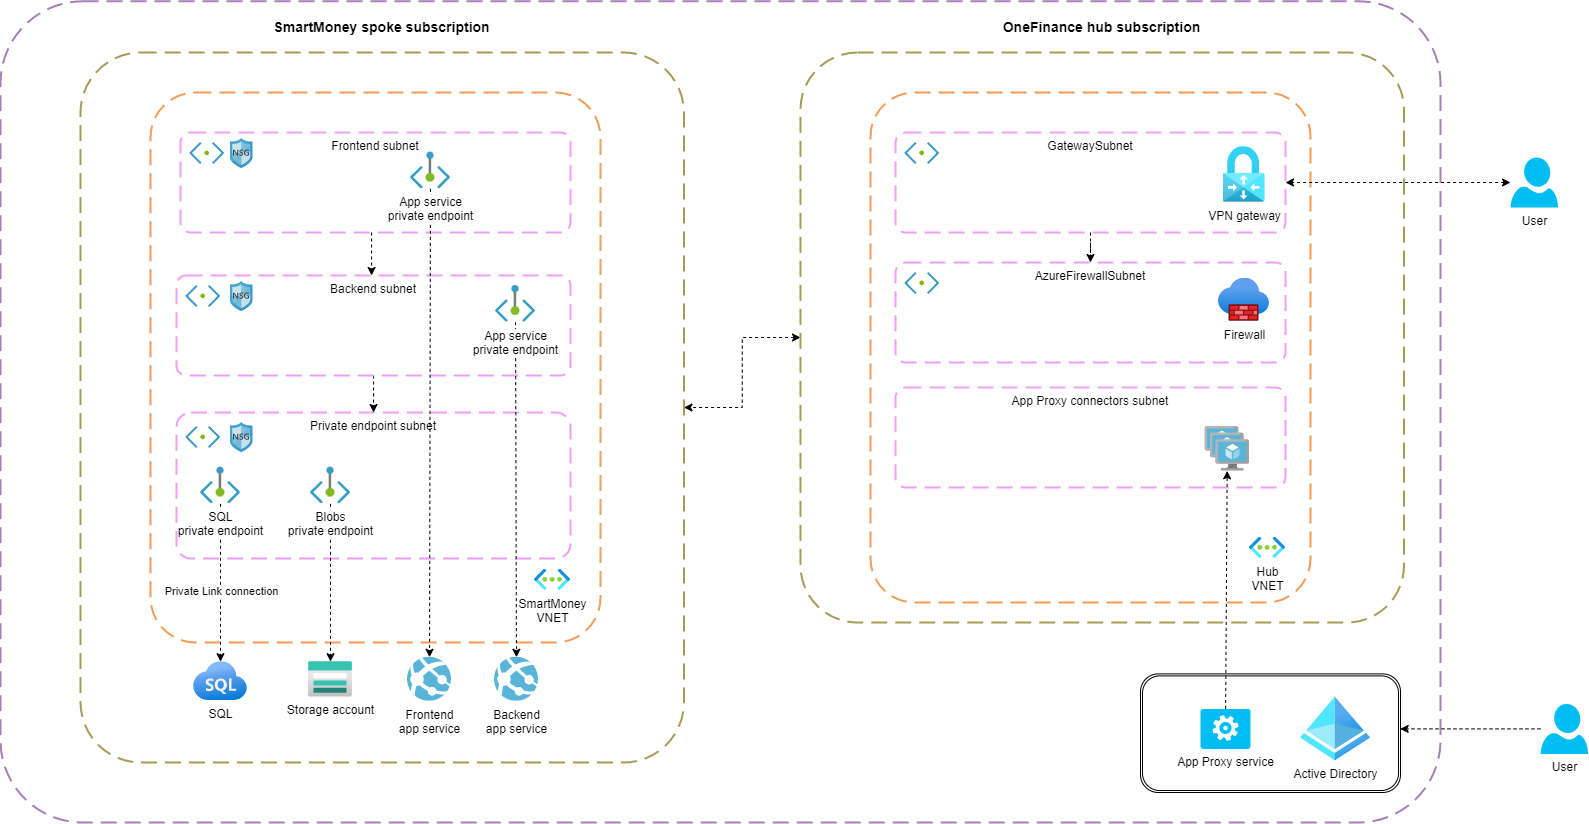
The SmartMoney workload is deployed in a separate spoke network. Three subnets are created: snet-frontend for the frontend app service, snet-backend for the backend app service and snet-private-endpoints for the SQL and storage account private endpoints. Below the architecture diagram.
The following diagram illustrates the traffic flow between the frontend, backend application, SQL database and storage account.
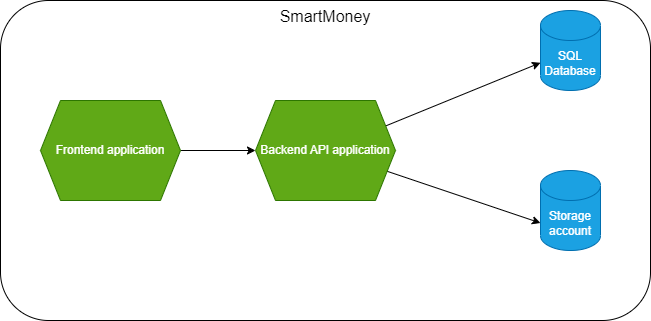
The frontend app sends API calls to the backend app. The backend app retrieves and stores data in the SQL database and storage account. The SQL database and storage account are protected with private endpoints, as I explained in a previous article.
Map the transaction flow
In the second step of the five steps methodology, we should map the transaction flow. This means that we need to define the traffic between the different components in our network. Typical questions to answer are: what are the inbound and outbound connections and what port and protocol is used? Below a simple transaction map for the SmartMoney workload:
| Source | Destination | Description | Port |
|---|---|---|---|
| Frontend application | Backend application | API calls | 443 |
| Backend application | SQL | SQL queries | 1433 |
| Backend application | Storage account | Retrieve and store blobs | 443 |
Now that we have the transaction flow mapped, let’s see how we can use network security groups to control the traffic flow.
What are network security groups?
Network security groups are a set of rules that allow or deny traffic to a subnet or a network interface. Rules are executed in a specific order to allow or deny traffic and the first rule that matches the traffic is applied. All other rules are ignored. Network security groups allows us to follow the principle of least privileged access because we explicitly allow the traffic that is needed. By default, all traffic is blocked and only the traffic that is defined in the transaction map is allowed. A network security group comes with a default set of inbound and outbound rules.
Default inbound rules
| Order | Name | Description |
|---|---|---|
| 65000 | AllowVnetInBound | Allow all inbound traffic from the virtual network |
| 65001 | AllowAzureLoadBalancerInBound | Allow the reserved IP address (168.63.129.16) of the Azure load balancer. Used for health probes. |
| 65500 | DenyAllInBound | Deny all inbound traffic |
Default outbound rules
| Order | Name | Description |
|---|---|---|
| 65000 | AllowVnetOutBound | Allow all outbound traffic inside the virtual network |
| 65001 | AllowInternetOutBound | Allow outbound traffic to the internet |
| 65500 | DenyAllOutBound | Deny all inbound traffic |
These rules already gives a good starting point. However, when following Zero Trust principles we want to ensure the least privileged access. This means that we don’t want to allow all traffic (AllowVnetInBound) from the virtual network. We want to explicitly allow the traffic that is needed as defined in the transaction map. For that reason, I added a deny all traffic rule. Let’s take a look at a network security group that is created for the snet-backend subnet. By default, all inbound traffic is blocked and only traffic from the snet-frontend subnet is allowed on port 433.
resource "azurerm_network_security_group" "snet_backend_nsg" {
  name                = "nsg-backend"
  location            = azurerm_resource_group.rg_smartmoney.location
  resource_group_name = azurerm_resource_group.rg_smartmoney.name

  security_rule {
    name                       = "allow-frontend-433"
    priority                   = 100
    direction                  = "Inbound"
    access                     = "Allow"
    protocol                   = "Tcp"
    source_port_range          = "*"
    destination_port_range     = "433"
    source_address_prefixes    = azurerm_subnet.subnet_frontend.address_prefixes
    destination_address_prefix = "VirtualNetwork"
  }

  security_rule {
    name                       = "inbound-deny-all"
    priority                   = 1000
    direction                  = "Inbound"
    access                     = "Deny"
    protocol                   = "*"
    source_port_range          = "*"
    destination_port_range     = "*"
    source_address_prefix      = "*"
    destination_address_prefix = "VirtualNetwork"
  }
}
The inbound-deny-all rule ensures that all inbound traffic is blocked. Because of the priority (1000) it takes precedence over the default inbound rules. The allow-frontend-433 rule allows traffic from the snet-frontend subnet on port 433. The source_address_prefixes field holds the IP address range of the snet-frontend subnet. A service tag is used in the destination_address_prefix field to only allow traffic to the virtual network’s address space.
What are service tags?
Service tags are predefined groups that represent IP address ranges of specific Azure services/ regions. This allows us to keep our network security groups clean and eliminate the need of manually entering IP addresses. This means that every time Azure updates an IP address range you don’t need to update rules in the network security group. An example, is the AppService.WestEurope service tag which is available for outbound rules. Let’s say that you’ve a virtual machine within a virtual network. The virtual machine needs to access an app service in the West Europe region. You can use the AppService.WestEurope service tag to only allow traffic to app services in the West Europe region. In my example, I enabled private endpoint for the app service which mean it’s accessible over a private IP address. For SmartMoney, I don’t need the AppService service tags because private endpoint is enabled for the app service so the traffic is routed over the virtual network. In the network security group rules I can use the virtual network’s address space or the VirtualNetwork service tag to control the traffic. The VirtualNetwork service tag represents the entire address space of the virtual network that the network security group is connected to.
Below the network security group for the private endpoint subnet. This allows traffic from the backend subnet to the SQL database and storage account on the respective ports. All other traffic is blocked.
resource "azurerm_network_security_group" "private_endpoint_nsg" {
  name                = "nsg-private-endpoint"
  location            = azurerm_resource_group.rg_smartmoney.location
  resource_group_name = azurerm_resource_group.rg_smartmoney.name

  security_rule {
    name                       = "allow-backend-1433"
    priority                   = 100
    direction                  = "Inbound"
    access                     = "Allow"
    protocol                   = "Tcp"
    source_port_range          = "*"
    destination_port_range     = "1433"
    source_address_prefixes    = azurerm_subnet.subnet_backend.address_prefixes
    destination_address_prefix = "VirtualNetwork"
  }

  security_rule {
    name                       = "allow-backend-433"
    priority                   = 200
    direction                  = "Inbound"
    access                     = "Allow"
    protocol                   = "Tcp"
    source_port_range          = "*"
    destination_port_range     = "433"
    source_address_prefixes    = azurerm_subnet.subnet_backend.address_prefixes
    destination_address_prefix = "VirtualNetwork"
  }

  security_rule {
    name                       = "inbound-deny-all"
    priority                   = 1000
    direction                  = "Inbound"
    access                     = "Deny"
    protocol                   = "*"
    source_port_range          = "*"
    destination_port_range     = "*"
    source_address_prefix      = "*"
    destination_address_prefix = "VirtualNetwork"
  }
}
Testing network security groups
Implementing network security group is a best practice to restrict the traffic flow however, it can be a bit tricky to test if the rules are working as expected. Unfortunately, there isn’t a good way of testing network security groups without deploying virtual machines.
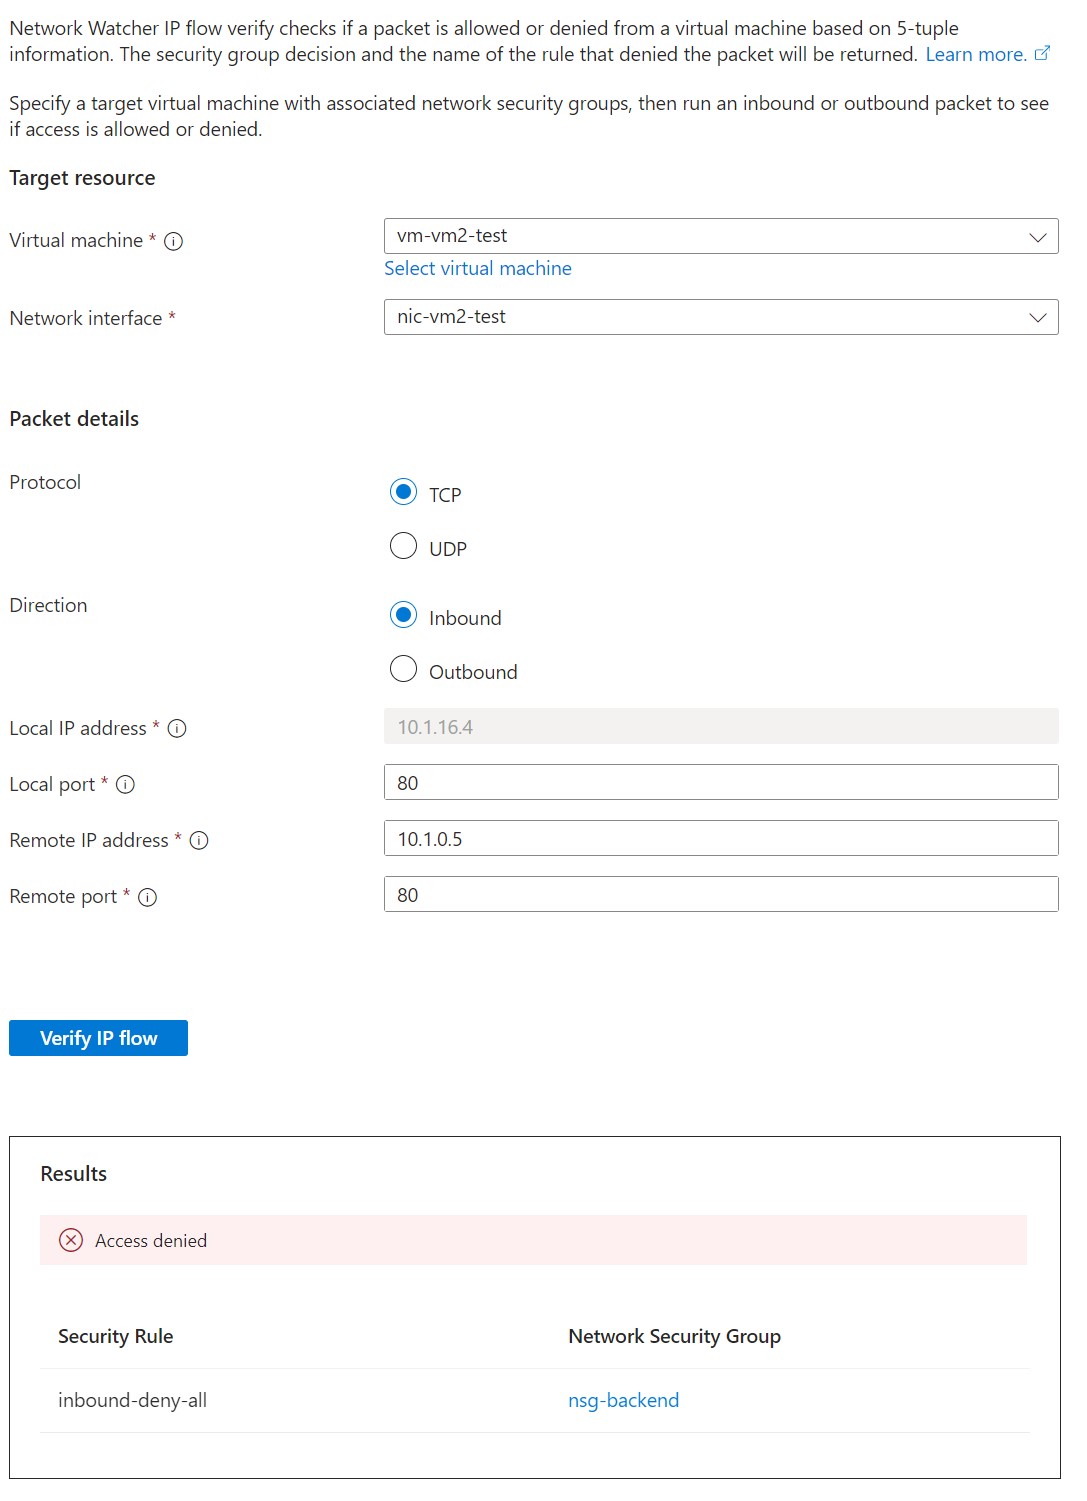
Test with IP flow verify
The IP flow verify allows us to test the network connectivity for a specific virtual machine. It simulates traffic based on configurations and reports back if traffic is allowed or denied by NSG rules. For this test, I deployed a Linux virtual machine (vm-vm2-test) in the snet-backend subnet. For my test, I selected the virtual machine as the target resource and the private endpoint for the frontend app service (deployed in snet-frontend subnet) as the source (remote IP address). In the screenshot below you see that traffic is blocked for port 80 which is expected because we only allow traffic on port 433.
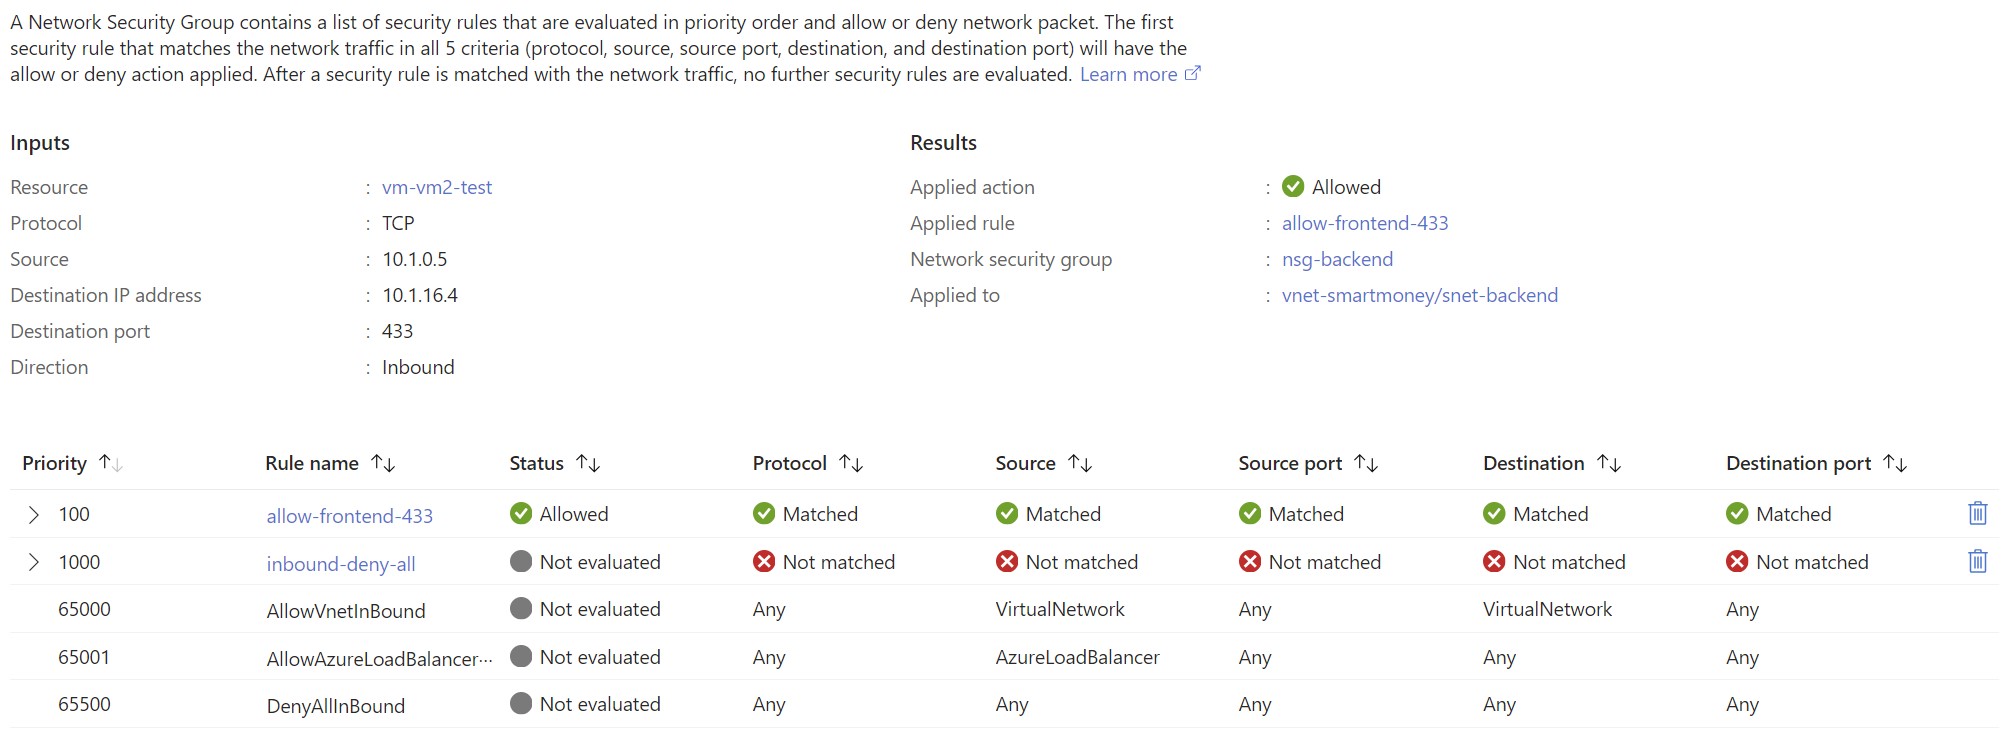
Test network security groups with NSG diagnostics
For diagnosing a network security group the NSG diagnostics tool gives a better overview. It reports back a more detailed overview of all the NSG rules. I executed a test with the same configurations as the IP flow verify test. In the screenshot below, you can see that one rule (inbound-deny-all) is applied and that the traffic is denied.

And a test over port 433 which is allowed.
As always the source code can be found on GitHub.
Zero Trust principles
Verify explicitly
With network security groups we can explicitly define and verify which traffic is allowed or denied based on rules. Access is only permitted when there is a rule that allows the traffic.
Least privileged access
The least privileged access principle tells us that we should grant the minimum level of access or permissions to perform a specific task. In case of network traffic that means that we should only allow the traffic that is needed. For SmartMoney, that means we only allow traffic from the frontend subnet (snet-frontend) to the backend subnet (snet-backend) on port 433. All other traffic is blocked.
Assume breach
If network security groups are implemented correctly we prevent that an attacker can move freely through the network.
What is next?
In the next article, I’ll continue with protecting our application and infrastructure with Entra ID conditional access.